
One of the final touches required for enjoying digital modes is setting up the audio levels. There are multiple controls hidden in different places so the process might be somewhat difficult the first time around. In this guide I’ll be using WSJT-X app on Windows 10 with Xiegu G90, but the process is similar with other software and rig combinations. Please use comments section below to share your tips and tricks on the subject.
Now let’s dig in…
1. Audio from Radio to Computer
1.1. Enable line audio output
Your Digirig is typically hooked up to the the auxiliary audio connector. Some transceivers may have a setting for activating that output. Others, like G90, have it permanently enabled so there is no such setting and we skip this step.
1.2. Set RF gain control to automatic
The level of incoming RF signal from your antenna varies greatly. These variations result in different levels of audio signal. At least initially we let the rig handle this by enabling automatic RF gain control. This way we don’t have to readjust levels manually every time your antenna gets in the path of your neighbor’s beam.
With G90 click “AGC” button below the screen until you see AGC-F or AGC-S at the top of the screen.

1.3. Set line out audio level
Buried in the menus on your radio find the line output level setting and set it to about 80% of the range. You may need to adjust it later if we bump against the limit elsewhere, but the reasoning for the high initial level is to have strong signal going into the wire; this way any noise it picks up in transit is less significant relative to the amplitude of our audio. We back off from 100% on the chance that maximum levels can overdrive the amplification circuit into non-linear territory introducing distortion.
With G90 hold “FUNC” button until the setting screen opens, scroll options forward with “VM” button below “NEXT” onscreen label until you see “6. AUX OUT Volume”. Use main dial to set it to 10 out of 12. Click “CMP” button below “SAVE” onscreen label to finish.
1.4. Configure recording device
In Windows search start typing “Control Panel” then select it from the list. Click on “Hardware and Sound” then “Manage audio devices” (category view) or “Sound” (icons view).

Your Digirig devices will appear under Playback and Recording as Speaker and Microphone with “USB PnP Sound Device” subtitle. If you are unsure which devices are associated with Digirig then unplug it from the USB and note which devices disappeared from the list.
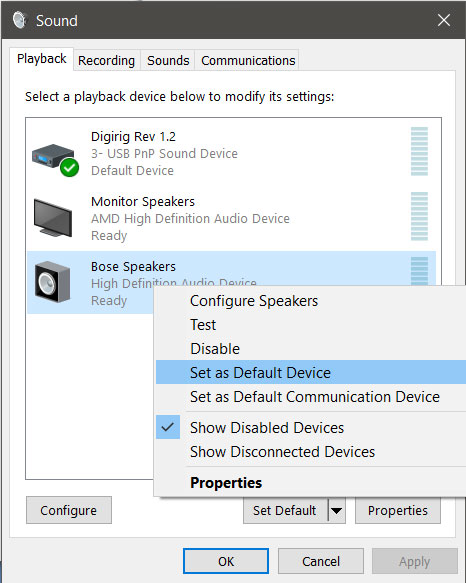
It is common for Windows to flag the newly detected audio interface as default for the system. After connecting Digirig, restore your previous configuration by right clicking listings for your regular PC speaker and microphone and selecting them both as system default and communication default.
In General properties for Digirig speaker and microphone change the default name to “Digirig”. You can also change the icon to a modem picture.
In Digirig’s Recording settings check “listen” if you want to patch through sound from the transceiver to the computer’s speakers. Uncheck “AGC” if available, leave other settings at defaults. Set microphone level to 20%, and keep the window open for the next step.
Note that if you reconnect Digirig into another USB port, the system may create another copy of the device settings and you will need to repeat the configuration steps.
1.5. Adjust recording device level
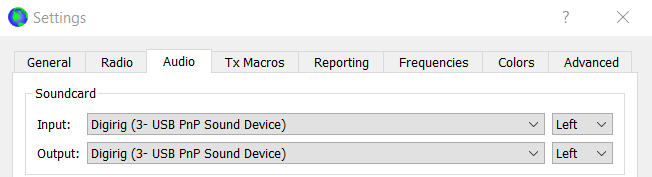
Start the digital modes app and select Digirig audio devices in configuration screen.
Find the received signal indicator, scope or waterfall. Using the level slider from the previous step, adjust the level so it is a touch below the overdrive territory. In case of WSJT-X it is the indicator on the left bottom and the level should be just below where the bar turns red.
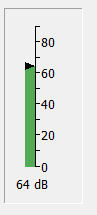
If you level slider reaches the minimum or maximum without the signal getting where you want it, go to step 1.3 and adjust the level on the sending side.
2. Audio from Computer to Radio
2.1. Configure playback device
Refer to step 1.4 above to configure and rename the Digirig’s playback device on your computer.
2.2. Set playback level
Set playback level slider to initial level of about 80%. The reasoning for this initial value is outlined in 1.3 above
2.3. Enable line audio input
If your Digirig is not connected to a regular Mic input you will likely need to switch your transceiver’s audio input to Auxiliary or Line input.
In G90 press “FUNC” button then click through onscreen options with “POW” button until you get to “INPUT”. Use main knob to switch from “MIC” to “LINE”.
2.4. Enable automatic level control
If available in your rig, enable automatic level control for audio input. Xiegu G90 has this permanently enabled for line input.
2.5. Adjust level in the app
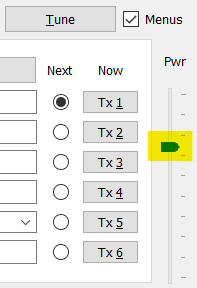
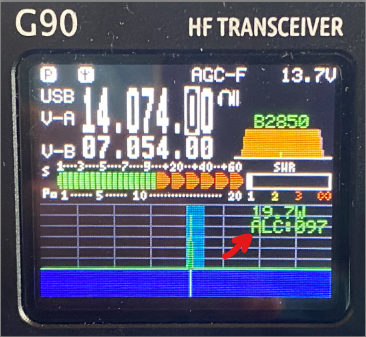
Start the digital modes software and select Digirig audio devices in configuration screen. Some apps offer output level control in configuration settings or on main screen. WSJT-X has “Pwr” slider on the right. If available set it to about 80%. Try transmitting (“Tune” in WSJT-X) and monitor your radio’s power and ALC (automatic level control) display.
Adjust playback level in control panel to where transmit power reaches the target value and before the ALC starts attenuating the signal.
On G90 watch for ALC value and set the level so it is just below 100.
Later use power slider in the app for fine adjustments as necessary.
Pingback:VHF/UHF Digital Modes with budget HTs – Digirig
Pingback:Troubleshooting Digital Modes – Digirig
Pingback:Digirig Mobile Rev 1.9 – digirig