
Digirig is often described as turnkey, just works and plug-n-play, however your mileage may vary. There is no shortage of complexity in radio even before we add computers. Such complexity makes this hobby a delightful bottomless pit of learning. It also leaves plenty of room for things to not work out-of-the-box.
With this I used my day’s allowance of idioms, moving on…
Here we’ll look at the ways to troubleshoot various issues related to setting up ham radio’s digital modes. Some solutions are specific to Digirig, but most are applicable to other interfaces. This list is the summary of the technical support solutions I provided via the email and in the user groups over the recent months.
General Troubleshooting Tips
Simplify and isolate: when something doesn’t work, try narrowing down your experimentation scope to a single concern. Don’t attempt debugging the hardware while also trying to configure a dozen configuration screens you have never seen before. Disconnect any non-essential hardware (amps, tuners etc.) from your transceiver and start with the most generic software package. My go-to choice is WSJT-X configured to directly control the radio.
Rollback to what works: if something worked before and after multiple changes it doesn’t, then try restoring working configuration and make changes one-at-a-time. Last change that breaks things is your culprit. If you worked digital modes with another interface then start with restoring that setup first – most transceiver settings will carry over.
USB – Interface Not Detected
Make sure the computer detects the interface. When Digirig is plugged into the Windows computer you should see new Silicon Labs CP210x USB to UART Bridge (COMx) device under Ports (COM and LPT) and USB PnP Sound Device under Sound, video and game controllers in Device Manager. Take note of the COM port number, you’ll need it later.

You should get similar results with lsusb and dmesg terminal commands on Mac and Linux or while using the graphics UI for system information.
If none of the Digirig components are detected by the system then try following:
- a different USB cable – some cables are missing the data lines and only good for charging. You may have to go through multiple cables until you find one that works. You can test a suspect cable with another data-capable USB device. This solution doesn’t apply to cables purchased from the Digirig store because they obviously meet all the requirements.
- a different USB port – it is possible that the issue is specific to a particular flaky USB port. Try a different one but keep in mind that the system may detect a fresh set of devices and your previous configuration will not apply.
- a different computer – to rule out computer related problems, especially in less consumer friendly systems such as Raspberry PI, try your Digirig with a different system. You’ll instantly know which side is giving you trouble.
If you have reliably determined that the issue is on Digirig’s side (which is an extremely rare occurrence), then please reach out to arrange a replacement.
USB – Drivers
Digirig’s audio codec is a generic USB device and it is recognized by all major OS flavors without the need for a vendor specific driver. The serial port part of Digirig is based on a widely supported Silicon Labs chip, however some systems may not be up to date, and that’s why I recommend installing the latest serial driver version.
Audio from Transceiver – No Sound, High/Low Level, Distortions
If you are not receiving audio from transceiver into computer then try following:
- check your cables – if you use homebrew cables then triple check your pinouts, pay close attention to signals’ perspective e.g. output can be radio’s output or interface’s output. Similar looking cables can have different pinouts e.g. Xiegu G90’s audio and Yaesu FT-8xx serial CAT are both 3.5mm jack to Mini Din-8.
- check your connectors – make sure you connect audio cable to Digirig’s audio socket. Transceiver side connectors can be confusing too – many radios use the same 3.5mm socket for speakers, CAT, CW, IQ etc.
- check the permissions – in some systems the access to input audio devices is subject to privacy settings and may be blocked for apps (e.g. “sound card device is not ready” error in windows).
- adjust recording device level – more information on setting levels for digital modes can be found this post.
- adjust radio’s audio output – if tapping headphones output the output is controlled by the volume knob. Some transceivers like Xiegu G90 allow level adjustment for line output, other radios have it fixed
- check audio device selection – verify that the audio device selected in digital modes app is one that belongs to Digirig. The generic name can be confusing so it is recommended to rename Digirig’s recording and playback devices in Control Panel to make them better recognizable.
- disable squelch – at least for troubleshooting to ensure the audio is not suppressed on the transceiver’s end
- try different audio channels – in settings of the digital modes applications you can select between the output through right, left and both channels. Depending on the radio and the cable, some option may result in no audio
- give permission for apps to access microphone – in Windows 11 modify privacy settings to allow apps access to Digirig’s recording device if you receive “Error in Sound Input” error messages
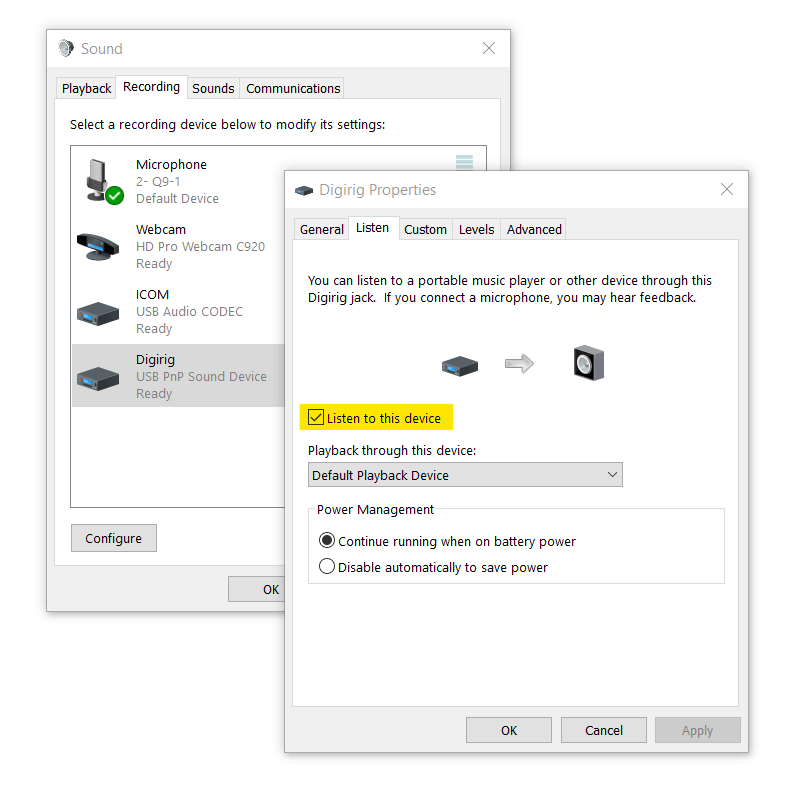
- patch through audio – in Control Panel on Windows check Listen to this device box on Digirig’s recording device so the incoming sound is heard on computer speakers. This way you can sample the sound is it is coming through
Audio from Computer – No Sound, High/Low Level, Distortions
If the audio from computer doesn’t make it on the air try following:
- check cables and connections as discussed in previous section
- adjust playback device level – more information on setting levels for digital modes can be found this post.
- switch from mic to line input – if using line input connection, make sure to configure radio to listen to that instead of the mic
- adjust radio’s audio input – Some transceivers like Xiegu G90 allow level adjustment for line input, other radios have it fixed
- check audio device selection – verify that the audio device selected in digital modes app is one that belongs to Digirig. The generic name can be confusing so it is recommended to rename Digirig’s recording and playback devices in Control Panel to make them better recognizable.
- test audio with headphones – plug a regular 3.5mm stereo headphones into Digirig’s audio socket and initiate transmit cycle. You’ll hear digital mode sounds on the right side, this indicates your software and Digirig are working as expected
No Serial CAT
Depending the setup you may be able to control many of your transceiver’s functions from the software on the computer. A good confirmation of a functioning CAT setup is a green “Test CAT” button in settings of WSJT-X and the ability to switch bands.

Transmission is a bit more nuanced and we’ll look into that separately. If you are having difficulties configuring the serial CAT then consider following tests:
- check radio’s capabilities – serial CAT is only available with the radios that expose serial interface. More information on the topic can be found in this post.
- check interface configuration – depending on your radio’s the CAT interface option you may need a specific revision of Digirig configured in a specific way and specific cables. Please carefully read the information on the product page for the interface and the cables compatibility. Your Digirig may come pre-configured if you requested it in your order or if the required configuration was apparent from the transceiver’s cables in the same order
- check cable pinouts – if you use homebrew cables then triple check your pinouts, pay close attention to signals’ perspective e.g. radio’s TX can be described as interface’s RX. Similar looking cables can have different pinouts e.g. Xiegu G90’s audio and Yaesu FT-8xx serial CAT are both 3.5mm jack to Mini Din-8.
- check your connectors – make sure you connect serial cable to Digirig’s serial socket. Transceiver side connectors can be confusing too – many radios use the same 3.5mm socket for speakers, CAT, CW, IQ etc.
- check the port configuration – review transceiver documentation, user groups youtube and growing list of posts on this site for the information on baud rate, parity and stop bits for your particular transceiver.
- check radio’s settings – you will need to configure your radio for CAT control through its menus and the configuration entries are notoriously non-descriptive. Luckily, there are lots of pages and videos online for configuring all popular transceiver models for digital modes and CAT configuration info for any interface will also work for Digirig.
- check software configuration – most importantly make sure that you select Digirig’s serial port and a correct radio’s profile which determines the supported CAT instruction set. If you can’t find your exact transceiver model in the list, please refer to the user groups for the recommended alternative. Keep in mind that if you reconnect Digirig to a different USB port on the same computer, the system may assign a different COM port to it.
- reboot the computer – serial port is normally a non-sharable resource (learn about the workaround) so if in the course of your experimentation one of the apps asserted control over it, the other apps will give you the error while trying to access the same port. Rebooting computer or unplugging/re-plugging the interface and then restarting the apps will resolve the conflict.
- do a loopback test – although a bit technical, this is a reliable test to determine that the serial port’s hardware and potentially the cable are working. Open Digirig’s serial port in the console (I use PuTTY) and type any text – there should be no output in the window. Short TX and RX lines of the serial port on the end of CAT cable where transceiver would be connected and type some more text – you should see the text echoed back in the window. What happens here is your text input is being sent out as serial data to TX line which is then received by the RX line of the same port and you see the output of that.
No Transmission
This section describes the case when the radio doesn’t switch transmission as instructed by the software. A good test for functioning PTT is a green “Test PTT” button in WSJT-X after switching to transmit and back to receive. Here are few suggestions on how to troubleshoot if things don’t go as expected:
- watch radio’s status LED – in this case we are not concerned with the power out, if the radio’s LED switches from red to green and back in sync with the transmission time frame then there is no problem with PTT/transmit. If radio switches to transmit but gets no power out then look at audio troubleshooting above.
- check CAT capabilities – if your setup is configured for CAT then the chances are that you can control the transmission with a command (PTT -> CAT), in a few transceiver models especially those with CI-V interface there is no CAT command for transmission and in this case the setup should use Digirig’s hardware PTT driver (PTT -> RTS). See next item for more information on PTT
- check PTT connection – if you are interfacing HT or other radio not capable of PTT via CAT then make sure PTT is configured and connected. In WSJT-X the setting is RTS under PTT. Other software packages offer this option as well. This functionality is not supported in Digirig before rev 1.5, Digirig rev 1.5 requires specific configuration for PTT, rev 1.6+ supports it by default. Cable must support PTT line in all cases.
- test PTT function – when using hardware PTT line you can test it by shorting the signal to the ground on the jack that would go into Digirig. This should switch radio to transmit. Some HT cables have a PTT button which should also work the same way.
Constant transmission, Unexpected Transmission
The hardware PTT line in Digirig is controlled by the RTS signal of the serial port. When this line is used for its legacy purpose (handshake and hardware flow control) it will cause unwanted transmission. If your radio keys up the moment you connect the audio cable then try following:
- disable handshake and hardware flow control – prior to connecting transceiver side cables configure the digital modes software in the way that handshake and hardware flow control of the serial port are disabled and RTS signal is not used for any purpose not related to PTT
- configure PTT by RTS – find configuration related to PTT and set it to be triggered by RTS of Digirig’s serial port. Look up the port number in the device manager as discussed earlier in section about USB troubleshooting
- disable serial CAT configuration – when interfacing HTs or mobile radios not capable serial CAT control make sure to disable this feature in the digital modes software by selecting “none” or equivalent option from the transceiver list. This can also be done temporarily for CAT capable transceivers to simplify and focus the troubleshooting of other areas of the system.
- disable gpsd on linux – gpsd mistakenly recognizes digirig’s serial port as belonging to a GPS receiver. This can be fixed by setting USBAUTO=”false” in /etc/default/gpsd
Sticky transmission, Errors on Transmission
If your radio starts transmitting as expected, but then doesn’t return to receive at the end of the TX timeframe or if you get errors during the transmission, but never while receiving then the issue is likely to do with the RF in the shack disrupting Digirig’s communication. The only way to get things back in order is to re-plug the interface and restart the software. Here are few of the methods to diagnose and resolve this issue:
- reduce the power to a minimum value and/or use a dummy load – if the issue goes away then it is definitely related to the stray RF in the shack
- lower SWR – tuned antenna is desirable for many reasons, if possible this would be the best solution for eliminating the RF reflected back to the shack
- use choke balun at the antenna’s feed point – this will block the reflected RF from traveling back to shack even if the antenna is not in perfect tune
- use ferrite beads on the cables – this will cut the RF from affecting the interface. This could be the only workable solution while using Digirig with HTs which due to the lack of grounding use anything that is connected to their chassis (including the operator btw) as their antenna’s counterpoise
Still Need Help?

If you after trying above suggestions you need further help with your Digirig setup or if you have a question about specific transceiver, operating system and software combination then check out the community forums, browse the forum tags to quickly narrow down to the most relevant posts. When submitting a new request, describe the results you received from the attempted troubleshooting steps above.